By: Jim Kushner.
Back around 1980 I bought my first shotgun, a used Remington 870 Wingmaster “Magnum” 12 gauge with a 30 inch full choke barrel. Having little intention of waterfowl hunting I quickly bought a shorter barrel with a mod. choke. These were fixed chokes, no screw in choke tubes back then.
Last year I was wiping down the old 870 and asked myself when was the last time I even carried it. My only bird hunting has been for upland birds and a 20 ga Special Field has become my favorite for that.
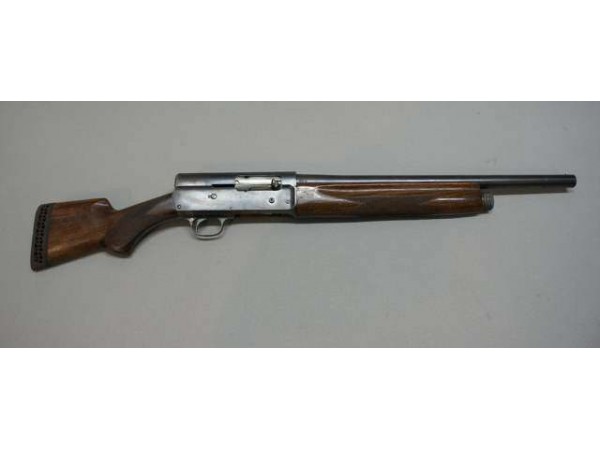
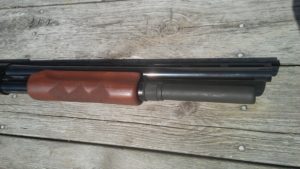
That’s when I started thinking about converting the 12 ga to a defense gun. I came across a set of take off, beater 870 stocks & I had an idea. I was going to build a “whippet”. Not to glamorize Bonnie & Clyde but I understand that they had carried a couple of shotguns with the barrels & butt stocks cut down. Supposedly to allow them to “whippet” out easier when needed. See pic below of a semi auto version “Whippet.”
I wanted to keep all of the original parts to the gun so I was going to use the beater stocks and the replacement barrel. That way I can return it to an original 1980’s duck gun again if for some strange reason I (or someone else) wanted to.
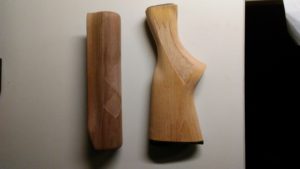
Step one was to strip the old finish from the beater stocks and since they had pressed checkering I wanted to redo that also. After stripping the finish I decided to cut down the fore stock a bit. I cut off the rear of the fore stock & sanded it down to eliminate the pressed checkering. I decided to checker this piece in the old 5 of diamonds pattern.
The butt stock was cut down as short as possible without having to replace the original stock bolt. This leaves what appears to be a mini butt stock instead of just a pistol grip. This also helps to keeps the overall length legal. I’m sure B & C were not worried about any legalities, this was probably just easier.
To give the butt a finished look I took the old plastic butt plate and attached it to the stock by aligning it so that the original screw holes were centered on the remaining stock end and then marked & drilled the holes. Once it was snugged in place I traced the edges of the stock on the back of the plate & removed it. After cutting the plate to size I snugged it back onto the stock and sanded it flush. Then I removed it again & used fine sandpaper & then 0000 steel wool to polish the edges. It came out pretty nice.
I used a chop saw and a fine blade to cut down the two stock pieces and then came the most time consuming part. Checkering them. I am strictly an amateur at stock checkering but when it was all over I was pretty happy with the results.
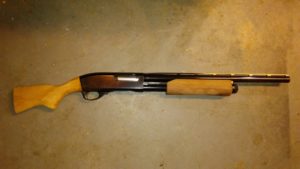
Then it was time to cut down the barrel. I had not done this before but decided to try using an abrasive blade and an old chop saw. Most shotgun barrels are tapered so I used the barrel rib and some clamps to help keep the barrel square to the blade. I kept the barrel a little over 18 inches long. The cut came out nice although there was a slight discoloring of the bluing when one spot got a little to warm. Probably because I went a little to fast. I put a slight bevel on the muzzle edges with a round tapered stone that I had and used a flat file wrapped in emery cloth to remove the marks left by the blade. I took the time to do this all by hand as I did not want to make any mistakes and then have to cut the barrel any shorter. A little cold blue and it was done.
Now it was time to do a test fitting. I left the butt plate off as I still needed to stain and finish the wood. That created a little bit of an issue as the butt stock was made of birch and the fore stock of walnut. I was able to stain both pieces to match pretty close and then I put a satin finish over that. It was a little shinier than I wanted so I went over it lightly with fine steel wool.
The gun just didn’t look right to me at this point so I started looking at extended magazine tubes. It turns out that a two round extension comes close to the end of the barrel without being to long. I found a used one at Brownells but it arrived without the spring or follower. I didn’t read the description carefully before ordering it. Back to Brownells for those two parts.
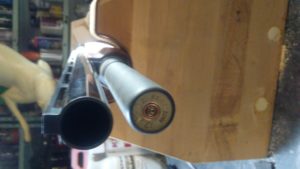
There was one more little problem with the mag extension, it was open at the outside end, meaning there was nothing to keep the spring inside. I found a simple solution that I actually like quite a bit. What fits fairly tight into a magazine tube? A 12 ga shell that’s what. I found a shiny piece of empty brass and cut off the plastic then slid it into the tube so that the primer end was facing out. The spring fits nicely into the base of the shell and has more than enough pressure to hold it in place even with the magazine empty. The spring Brownells sent was so long that I had to cut a few coils off of it, I’m guessing it was designed that way to accommodate any size extension. That was an easy fix.
.
You may have noticed that there isn’t any type of front sight bead. I thought I would wait until I had a chance for some extended range time before deciding what is or isn’t needed. I could replace the original bead or maybe just use one of the fibre optics that snaps onto the rib. I am leaning a little that way as this would make a nice short barrel deer gun by just replacing the original butt stock. As important in any project…have fun with the journey and you’ll appreciate the destination that much more…
He is a life long resident of Michigan with an equally long love of fishing, hunting and the outdoors.
He and his wife have lived happily on a small piece of land in northern Michigan for the past 30 years.
They retired a few years ago and Jim spends most of his free time trying to get caught up on all the home improvement projects that he should have done on his days off instead of hunting and fishing.
He will likely tell you that he never tires of sitting in the deer woods where all of the worlds problems are easily solved.
- Backpack into the Ontario “bush” for Lake & Brooke Trout - February 13, 2026
- My 50th Year Anniversary! - December 7, 2023
- A Methodical Deer Tracking Effort Can Minimize Mistakes - December 21, 2022